Sunday, 25 January 2015

Bhapa Pitha (Stuffed Rice flour Dumplings)


There are some dishes which we love not only for its distinct taste but also because it brings back some sweet memories with it. Isn’t it??Growing up in a Bengali family there’s one thing which cannot go a miss on #Makar #Sankranti and that’s ‘#pitha’ …Making Pitha on this day  has been a tradition of our family and even today when I make them I miss my grandmother who taught me this delightful recipe . ‘#noler #gur’ or ‘jhola gur’ is the flavour of the season and in east India you will find innumerable sweets of this flavour around this season. In this dish too it adds to the aroma and taste which cannot go unnoticed.
Pitha is a rice flour dumpling with coconut and milk solids. It just melts in your mouth and believe me your taste buds will bless you for such a treat ;) Pitha which originated in Bangladesh is very popular in east India and there are innumerable ways of making them but I’ll be making one of the #easiest and #healthiest pitha which can be made in no time…But yes you do need to prep up for it beforehand.

So let’s get started and welcome our winter mornings with a plate full of hot pithas.


INGREDIENTS :

For the Dough

1)    Rice flour – 2 cups   (you can find  rice flour in any grocery store)

2)    Boiled water -1 cup

3)    Salt- ½ tea spoon

4)    Sugar 1 tea spoon

For the stuffing with coconut (you can experiment with any other kind of stuffing too)

Note: you can make the stuffing and keep in refrigerator to use when needed.

1)    1 grated coconut

2)    Jaggery -100 gm/Sugar -100 gm

3)    Cardamom powder- ½ tea spoon

4)    Oil- 1 table spoon   

PROCEDURE:

1)    For the stuffing take a wok and put some oil and heat it.

2)    Put the grated coconut and keep cooking it till the raw smell is gone and it starts becoming golden brown in colour.

3)    Add the jaggery and cook it till the jaggery melts.

4)    Add the cardamom powder .Keep stirring it so that nothing settles at the bottom.

5)    Turn off the flame when you see the mixture is cooked and you get the aroma of it.

For the Dumplings:

1)    Take the rice flour, salt and sugar in a flat bottom vessel and mix them together.

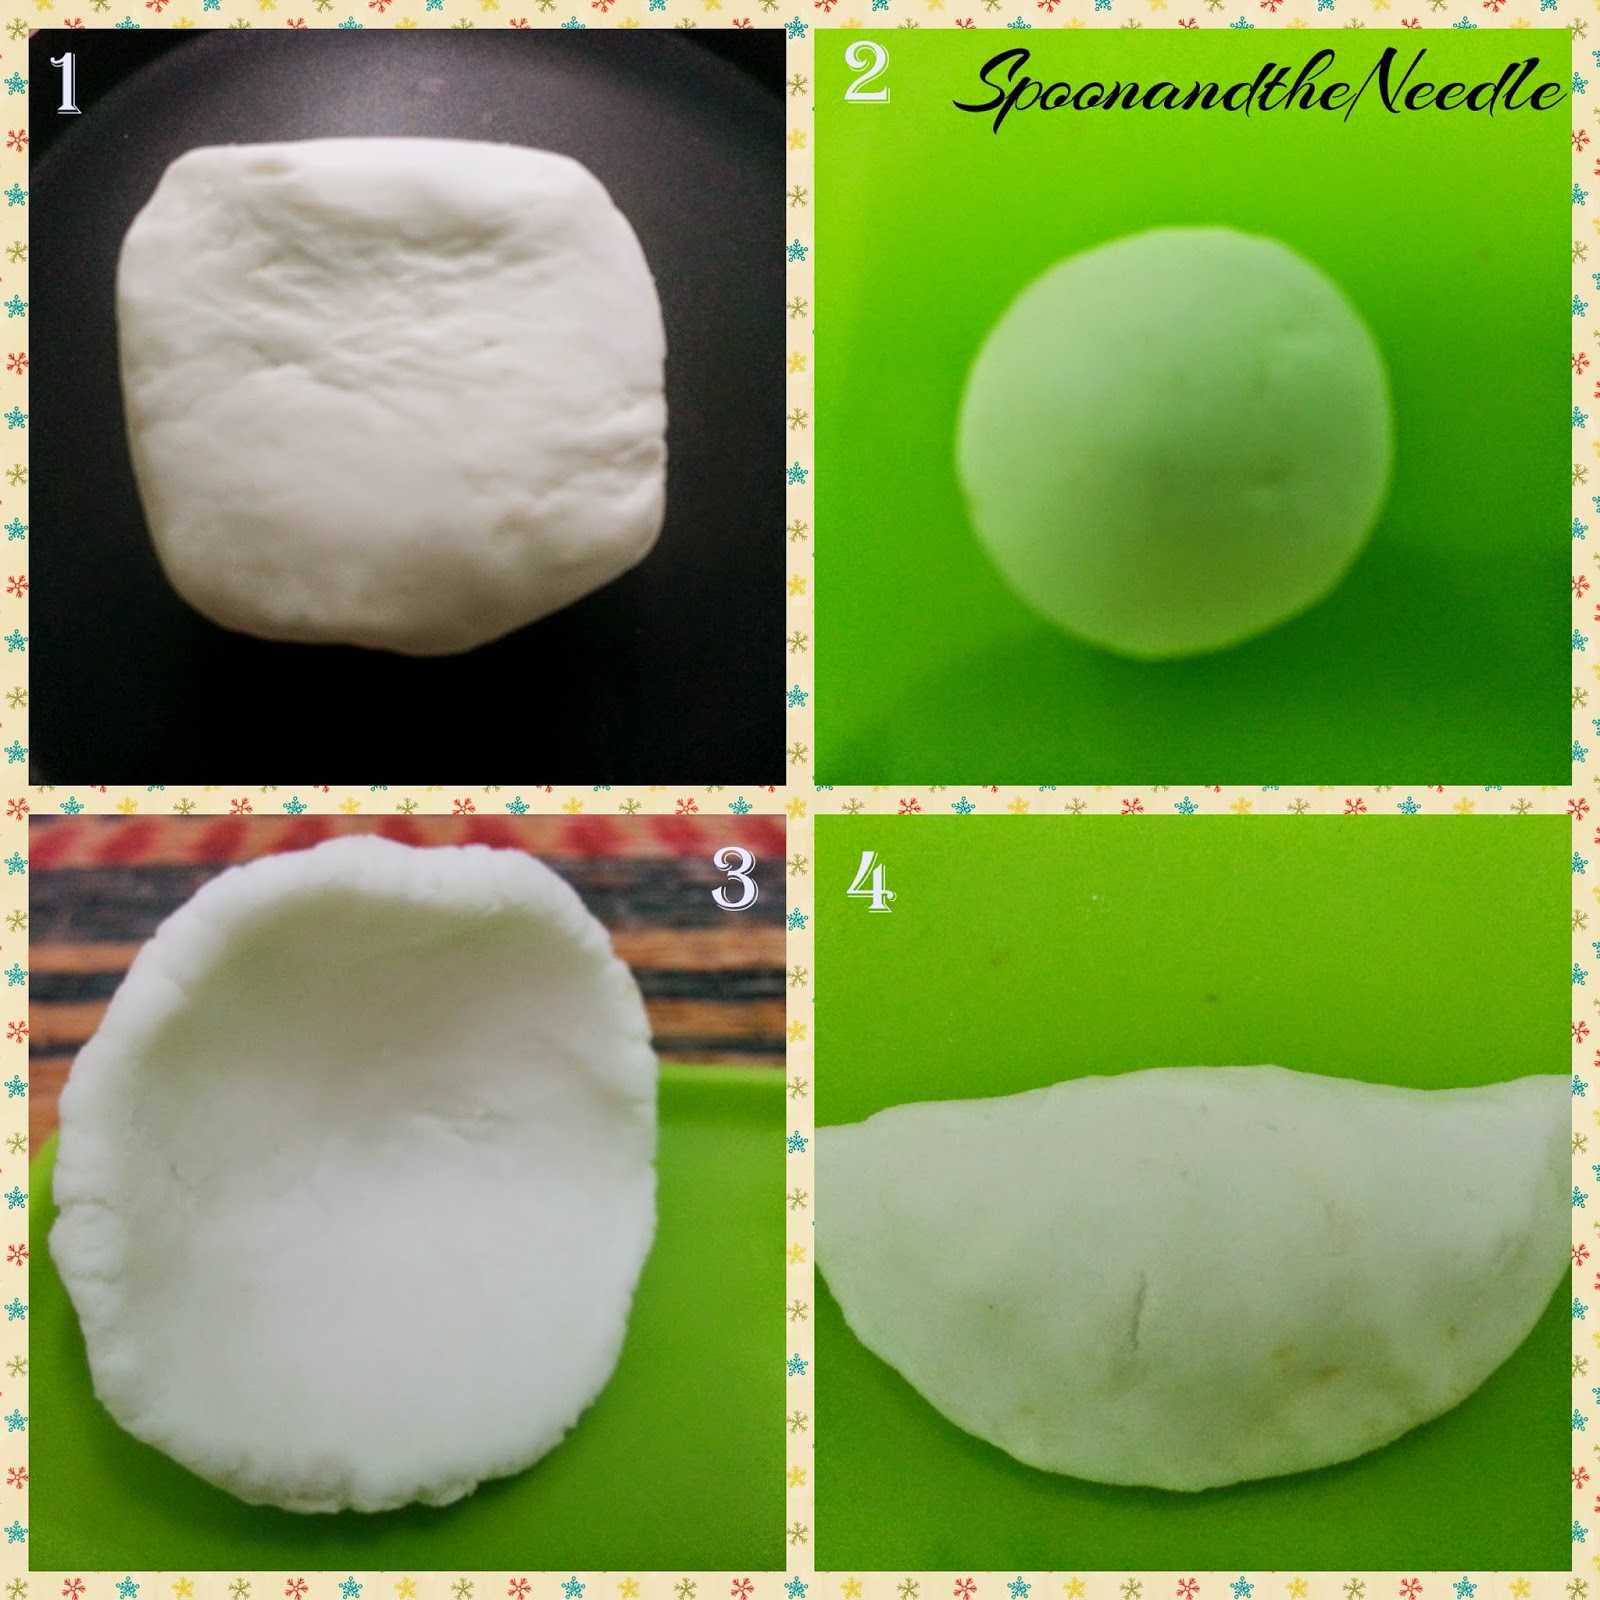
2)    Add warm water to it in small quantities to make soft dough.

3)    Take some of it at a time a roll to make a small ball.

4)    Make a whole in the centre to put the stuffing into it.

5)    Once you have put the dough seal it by bringing both the ends together. (It will look like a semi-circle.)

Note: you can give it any shape you desire provided the ends are sealed.

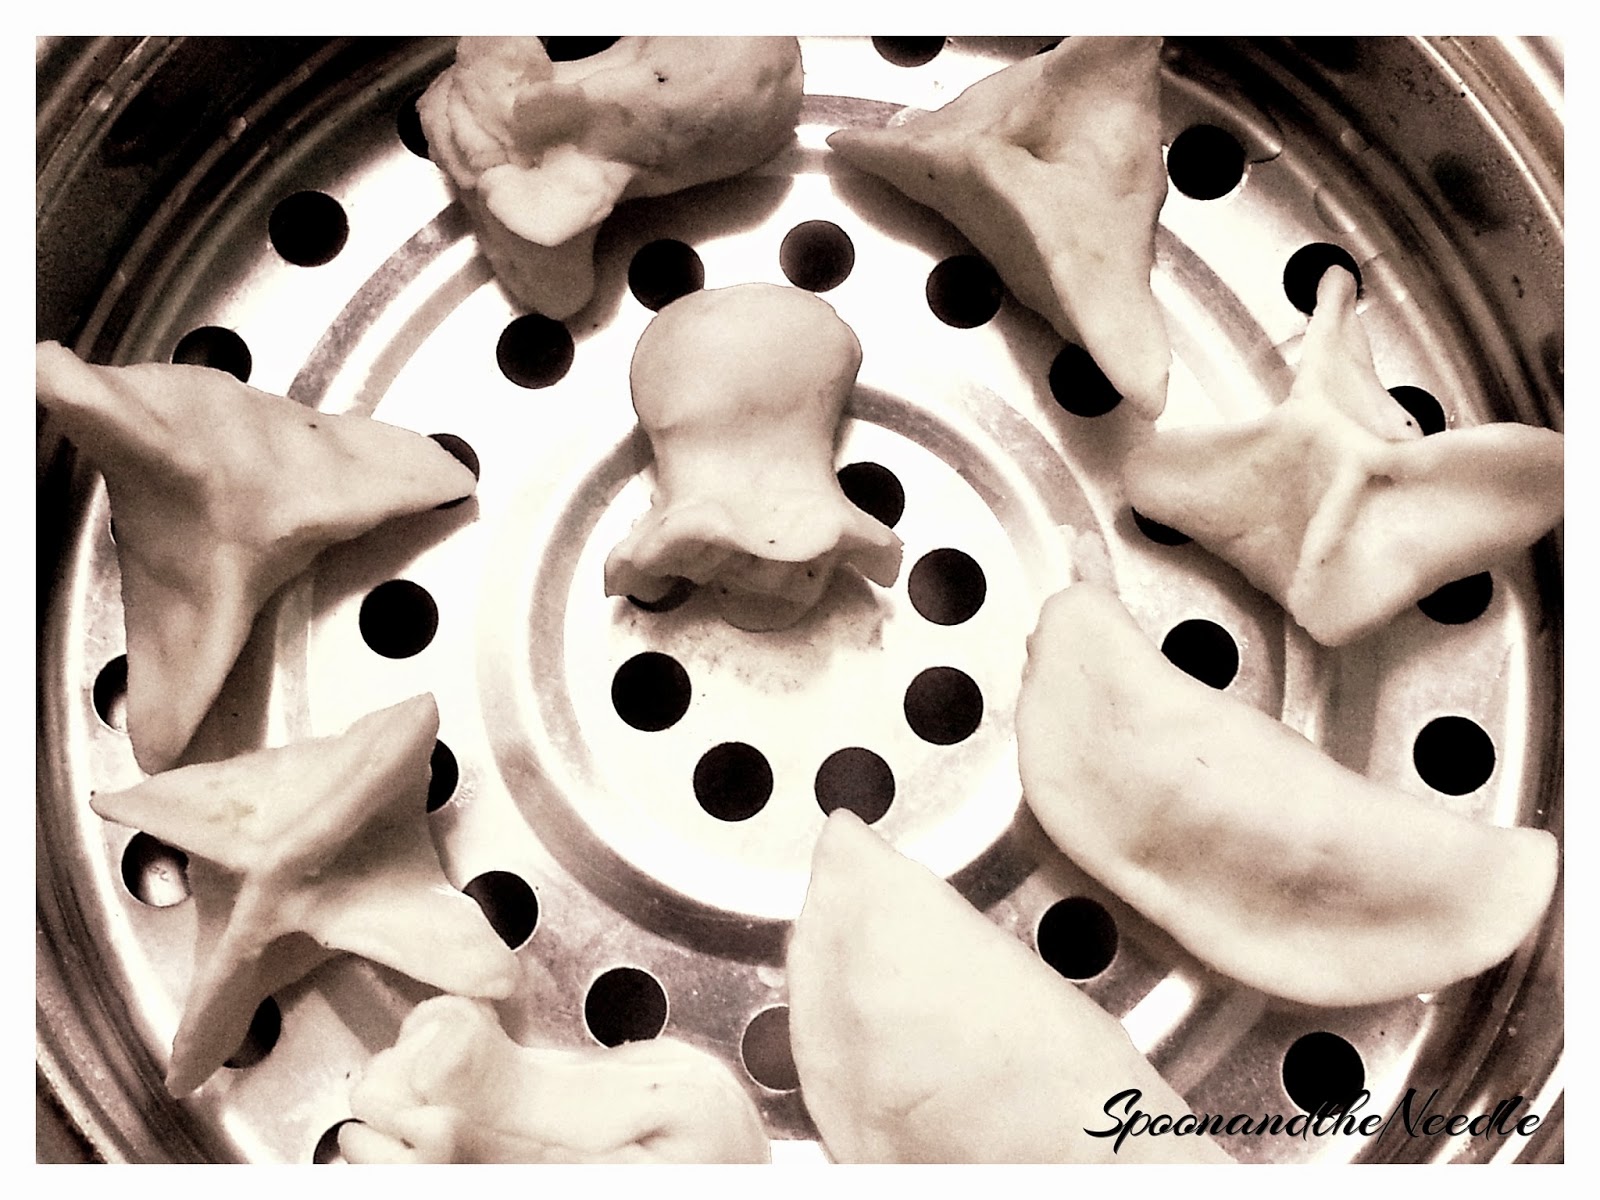
6)    In a steamer heat some water and put the raw pithas into it.
 

Note (If you don’t have a steamer .Put some water in a pot and tie a cotton cloth on it and tie the ends around the neck. Put the pithas on it and cover with a lid.)

7)    The pithas will be cooked within 20 minutes. If you see it’s not cooked then leave it on for 5 more mins.

8)    Serve hot with fresh jhola gur(Date palm jaggery syrup) or anything of your choice.

Do let me know how you found the recipe and also your memories of pithas.

Happy Cooking!!

Madhumita


Wednesday, 21 January 2015

Easy Masala Keema Recipe (Minced meat Recipe)


The Indian kitchen has gone global and the word ‘Keema ‘has been added to the oxford dictionary. It feels so good to see our Indian cuisines being globally appreciated and loved. The Keema (minced meat) is a very flavourful dish and can be ready in minutes. You can bring in a lot of variety to it with the choice of condiment you use but the most famous is the masala Keema which we get in almost all the dhabas (roadside hotels on the highways) of our country. So let’s bring in the dhaba into our kitchen and surprise our family with the authentic masala Keema in the comfort of our home.
                                            
INGREDIENTS

1.       Keema – 500 gm (you can use any minced meat of your preference)

2.       Tomato puree -2 cups (Approx 4 tomatoes)

3.       3 large onions (chopped)

4.       1 tea spoon Cumin seeds

5.       Ginger paste – 1 table spoon

6.       Garlic Paste -1 tbsps

7.       Onion paste – 2 tbsps

8.       Cumin powder- 1 tbsps

9.       Coriander powder- 2 tbsps

10.    Red chilli powder – 1 tea spoon

11.    Asafoetida (hing) – ½ tea spoon

12.    Mint leaves – Finely chopped -1/4 cup

13.    2 cloves, small stick of cinnamon,2 cardamom coarsely grounded.

14.    Oil (approx. 4 tbsps)

15.    Salt to taste.

16.    A pinch of sugar

17.    Turmeric powder- 1 tea spoon.

18.    Juice of 1 lemon.

19.    boiled eggs (optional)

 PROCEDURE:

1. Take some water in a bowl and mix (This makes the Keema more supple and tastier)

2. Take some oil in a wok and put the cumin seeds, ginger , garlic  and onion paste. Fry it for 2 mins.

3. Put the sliced onions and cook till its brown.

4. Add the tomato puree and cook it for 4 to 5 mins. ( cook the tomatoes till there is  no raw smell)

5. Add some turmeric, red chilli powder and a pinch of sugar (this gives good colour to the food)

6. Cook it for a few more minutes and add the Keema and some salt to taste. ( you can add some green peas as well which is abundant around this season.

7. Cook it on medium flame and when the water starts drying add the mint leaves, the powdered cloves, cinnamon, cardamom and the juice of a lemon.

8. Cover the lid and let it cook on medium to low flame for a few more minutes.

9. Garnish it with Boiled egg and serve with Indian flatbread or rice.


Happy Cooking!!

Madhumita


Wednesday, 14 January 2015

Healthy and easy Methi paratha in few minutes (Fenugreek flatbread)


I love everything about Sundays except for the question which rings in my mind the moment I wake up ‘what special should I cook today??’ I think this is the story of each and every family now. Throughout the week we are busy in our day to day chores. The week days fly away in this hustle bustle and the only thing which keeps us going is the upcoming  “weekend” .So when the weekend finally arrives we love to treat ourselves with good food accompanied with some family time, light conversations and laughter and ...there again.. We are set for another hectic week.

So here’s a very simple recipe to kick-start your super Sundays. Methi paratha which is tasty, healthy and truly a time saviour leaving you with plenty of ‘me’ time to spend :) :)

Fenugreek has many medicinal properties and is very rich in antioxidant and iron. It is ideal for people with blood sugar problems and diabetes so here’s a good news for such patients too as they can also savour this dish. It also works wonders for the hair and skin and making it a part of our diet can actually be very beneficial.


So why wait ?? The markets are green with fenugreek leaves this season so grab a few bunches and try out this piping hot recipe :)
                                                   

INGREDIENTS

Serves 3

1) Wheat flour -350 gms

2) Chickpea flour (besan) – 1 cup approx. 100 gm

3) Fenugreek leaves (cut very finely) 2 cup

4) Carom seeds (ajwain)-1 tea spoon

5) Cumin seeds -1 tea spoon

6) Asafoetida (hing)- ½ tea spoon

7) Ginger –finely chopped -1 tablespoon

8) Salt to taste

9) Oil – (for frying and kneading)

10) Dry flour

11) Garlic – coarsely chopped and fried – 2 table spoon

12) Butter

13) Water

14) Sugar – ½ tea spoon


Method

1) Take the wheat flour, chickpea flour,4 table spoon oil, cumin seeds, carom seeds, asafoetida ,ginger paste and oil in a bowl and mix them , add the chopped fenugreek leaves and knead it. Add water little by little and form a soft dough .Cover it with a lid and leave for 5 – 10 minutes

2) Take a flat tawa or pan and put it on medium flame.

3) Make medium sized balls with the dough. Now take one ball at a time on

 the rolling board. Cover it with some dry flour (we do this so that the dough does not stick to the board and we can roll out the paratha easily) (Roll it the way we roll normal roti’s i-e flat breads and pizza bases.

4) Roll the dough and make a paratha of 6’’ approx. diameter.

5) Put the paratha on the tawa let it cook till you see the top of the paratha hardens and changes colour. Flip it and let the other side of the paratha to cook too. When you see both the sides have small brown spots take some oil and spread it all across the paratha on both sides and let it cook for some more time. You will start getting the aroma of the paratha by now. When you see both the sides are cooked take it out on a plate.

6) Put some butter on it and spread some fried garlic. (This is optional and entirely depends on your choice)

 Serve it hot and club it with pickle, yoghurt or raita.

Enjoy this meal and do let me know how you like it.

Happy Cooking!

Madhumita.


Friday, 9 January 2015

Nutritious and easy to cook Snack- Kothimvir Vada


Wishing a very happy new year to all my friends J I hope you had a great one!

Last 10-15 days have been like a big carnival with unlimited fun, frolic, craziness and most importantly FOOD J It is around this time of the year when everybody loves to lower their guards and just soak into the madness…As December sets in people all across the world start looking forward to the festivals, holidays and get together and the  weather acts as a catalyst to all this .I have seen even the most fitness conscious people indulge in rich and grand meals, road side food, chocolates, cakes and what not without any guilt of consuming tons of calories … and if they are questioned they would happily blame the festive season ;)

But once the festivities are over, then what?? Our weight makes a new record, our skin cries for help and our stomach says no more muck .And then we start craving for simple home cooked food. Don’t we?? So here’s  a recipe which is super tasty ,very light and nutritious too. This is a Maharashtrian delicacy known as Kothimvir vada which can be teamed with a hot cup of tea or coffee in your cosy little balcony. Be it a kitty party, picnic or a lazy afternoon ,this snack fits into all this and more.

 Kothimvir means cilantro in Maharashtrian language. One of my favourite herb which is mostly used for dressing up meals. I call it the magical herb because it blends perfectly with most of the Indian dishes and instantly makes the food more appealing as well as  adds in to the taste with its flavour. Not only Indian cuisine it is widely used for Chinese, Thai and Mexican dishes as well. The most interesting thing in this dish is here Cilantro is not used for dressing, in fact it is the king of the dish and without it the dish is incomplete.

So do enjoy this nutritious and low calorie snack and let me know how you like it.

Ingredients:

1)2 cups packed cilantro leaves, chopped fine
2)1 cup chickpea flour/besan
3)2 table spoon all-purpose flour
4)4 green chillies, minced fine
5)1 tsp. ginger-garlic paste
6)2 tsp. lemon juice
7)1 tsp. turmeric
8)pinch of asafoetida
9)1/4 tsp. baking soda
101 tsp. sugar
11)salt to taste
12)Oil for frying


For Seasoning
1)Mustard seeds -1 table spoon
2)cumin seeds- 1 tea spoon
3)Slit green chilly- 4
3)oil
 

Method:
1. Mix all ingredients together in a bowl,t except for the oil.
2. Add a little bid water and make a dough.(the dough should not be too tight or too sticky) .Roll the dough and give it a shape of a hot dog
3. Grease a flat vessel. Put the dough onto it.

4) Make a double boiler or use an electric steamer. (If you do not know how to make a double boiler stand check my dhokla recipe for the instructions)
5) Steam for about 30 minutes till a skewer inserted in the middle comes clean.

6) Let it cool for some time and take it out in a plate. Cut it into your desired size.

7) Take a frying pan and put some oil into It.shallow fry the vadis till golden brown. (If you want you can deep fry them too but I prefer the shallow fried vadis more)

8)For Seasoning -take little oil. When its heated put the mustard seeds. When they stop spluttering put the cumin seeds and slit green chillies. When they are done spread on the Vadis

9) Serve hot.

Note – you can keep some of the pieces in an air tight bag in deep freezer and it stays till a month.


Happy cooking!!

Madhumita


Tuesday, 2 December 2014

Aloo Wadi Subji (Potato and Dried lentil dumplings recipe)


Last Friday my husband returned home with a packet in his hand.
On asking what's there in it he replied its a souvenir a colleague brought him from Amritsar.
I got excited and immediately opened it and was a little shocked for what I found in it. There were some big dried dumplings(wadi ) in it.(n believe me Big means real BIG!)Now who on earth gifts wadi's as souvenir ??I knew that Amritsar wadi's are very famous but had no clue of how to cook it.

I tried my hands on it the next day and the outcome was .......we ordered Pizza that night...;););)But then, I did not want to give it up on it so easily and called one of my Punjabi friends and learnt the process and finally was successful in putting the 'Punjabi tadka' to my food...
It is said that Vadi's originated in Rajasthan as vegetables are scarce there and they had to mainly live on lentils. So they came out with this process where they made paste of  the lentils combined them with various spices and sun dried them. These are not only tasty but healthy and filling too.
 
If you think about it ,Vadis are not only confined to Rajasthan and Punjab but it is made in almost all the regions of our country with different variations.Earlier like many other things wadi's were also made at home where the older ladies passed on their expertise to the younger amateur ones. There would be chat sessions, gossip and laughter and I think it was because of this that the wadi's got that extra flavour of love which the market one's lack. In my house wadi's were made by my Grandma which were the tastiest wadi's I ever had. I remember her sitting in the Sun in the chilly winter mornings and making different varieties of them .small wadis, spice wadis and many more which were used in different recipes in different ways which added to the taste that dish. My personal favourite is the small masoor dal wadis which is deep fried and I will share its recipe with you very soon.
For now,here is the recipe of Amritsari aloo wadi. But if you don't have amritsar wadi you can also try it with any masala wadi which  you will get in any of your nearest grocery store. Do try it and let me know if you have any other idea of having these Wadis.

INGREDIENTS
1)Wadi - 2
2)oil
3) Pinch of aesofodita
4)Kasuri methi (dried fenugreek leaves )
5)cumin seeds -1 tea spoon
6)Ginger paste -2 table spoon
7)Turmeric powder
8)Potato -2
9)Paste of 1 medium sized tomato and onion
10)Chopped coriander for ganishing
11)Salt to taste
12)1/2 tea spoon sugar
 

PROCEDURE:


1.Break the vadis into peices.

2.Put some oil in a frying pan and pry the wadi's over low to medium flame.

3.In a vessel put some oil.Put the pnich of aesofodita ,kasuri methi (dried fenugreek leaves ) and cumin seeds.

4.Put the ginger paste,cumin powder coriander powder and turmeric powder and fry it .

5.Add the tomato and onion paste and fry it till the oil starts leaving the surface.

6.Put the potatoes and salt and cook it for a few minutes.

7.Put a cup of water and cover the vessel with the lid.Keep in on low flame and let it cook till the potatoes become tender.

8.When the potatoes are tender add the fried wadis.Add some water if needed and cover it again for 5 to 8 minutes.Keep the flame low.

This way the flavours will mix in together.

9.Garnish with freshly chopped corriander and serve with Roti or rice.


Happy cooking!!

Madhumita.


Monday, 10 November 2014

Instant Khaman Dhokla

Before I start  today’s recipe there is a brain teaser for u. Can you name a dish which is Healthy,tasty as well as super easy to cook??think think… ok ..time up!! Its Khaman also commonly known as dhokla…this spicy savoury cake is a treat to your taste buds as well as yummy for your tummy.
My city, Kolkata is famous for its sweet shops.You will find a few in every nook and corner and these shops have this new item in their platter and believe me its lip smacking and sells like hot cake..
I think in every family there is a dhokla fan and in my family it’s my husband. He is a great dhokla lover and I bribe him with it whenever I need to..Typical wife,Isn’t it… ;)

Almost every Indian has watched three Idiots and Kareena Kapoor has made dholka even more famous with her dialogue where she says dhokla sounds like a bomb and I feel to some extent its true because it’s seriously an explosion of flavours..A perfect blend of all the 4S’s…sweet,sour,salty and spicy and the tempering adds in to the aroma and taste.
Try this out at home and surprise the dhokla fan in your family with this scrumptious dish.
It is best served with green chutney or hot and sour tamarind chutney.


INGREDIENTS
    1.  Gram flour – 1 cup. Approx 100gm
   2.       Semolina -2 table spoon (optional)
   3.       2 lemon juice
   4.   Ginger paste -1 table spoon
   5.    Green chilli Paste- 1 tea spoon
                                                         6.      Eno fruit salt – 1 table spoon.                                                                   (preferably the blue one)
                                                          7.    Salt to taste
                                                          8. Vegetable oil – 2 table spoon
 

                                                                       For tempering

9.                                                                                                                    1.Water -1 cup
1                                                           2. Sugar -2 table spoon
1                                                           3.  Pinch of salt
1                                                           4. Curry leaves- 10 to 12
                                                             5.   Mustard seeds -2 tea spoon
                                                             6.   Slit green chillies -6

                                                                      For Garnishing

1                                                             1.   chopped Coriander       
1                                                             2.   Grated Coconut (optional)

                                                                     PROCEDURE:
  1.   Mix the gram flour and salt in some water and make a fine paste. Make sure there are no lumps and the consistency should be like idli batter.Add the ginger paste,oil ,green chilli paste and lemon juice to it and mix them finely.
2)      Cover it and leave it for 20 minutes.


3)      Till then you can prepare the tempering. In a pan put some oil. When the oil is hot put the mustard seeds. The mustard seeds will splutter. To this add the curry leaves and green chilly. Add the water, sugar and salt and let the sugar melt. After it comes to a boil switch it off and let it cool.


4)      Take a wide mouthed pan which has a lid and put a stand on it. Fill it half and let the water boil. Take a smaller container which will fit inside the bigger one when the lid is covered.(like a double boiler).Here's  a pic  to make it clearer to understand.We will pour the batter in this container to cook the Dhokla.


     Grease the small pan with some oil. In the dhokla batter, add the eno powder and mix it well. You will see the batter becomes fluffy. Immediately put in the batter in the greased container and put it on the stand inside the boiler.(Note:  mix the powder just before you  put it in the oven for cooking)

5)      Put the lid and leave it on medium flame for15 - 20 minutes to cook.(Note-Put the plate inside only when the water is boiling or else the dhokla won’t be fluffy)

6)      Check if  it is cooked or not by inserting a toothpick. If it comes out clean it means the dokhla is ready and if not then leave it on for some more time.

7)      Let it cool for some time and then take it out in a plate very carefully.

8)      Cut it in your desired shape.

9)      Pour in the liquid little by little on top of the dhokla.You can see it absorbing the liquid and becoming fluffier.
10)   Leave it for 10 minutes

11)   Garnish with coriander and coconut and serve.


Do try it and let me your experience.
Happy cooking!

Madhumita.